The Shelly 2PM Gen4 (S4SW-002P16EU) is one of the most versatile smart relays on the market. In this guide we’ll use it to control electric roller shutters (tapparelle), configure it via the Shelly app, switch it to Zigbee firmware, and finally integrate it with Home Assistant using the ZHA (Zigbee Home Automation) integration — including post-switch configuration/calibration from the web panel and an emergency write-attribute fallback.
ℹ️ Check your exact Shelly model before starting: Only the Shelly 2PM Gen4 (
S4SW-002P16EU) includes the multi-protocol radio required for Zigbee connectivity (alongside Wi-Fi, Bluetooth, and Matter). Earlier generations such as the Shelly Plus 2PM (SNSW-002P16EU, Gen 2) only support Wi-Fi and Bluetooth and cannot be switched to Zigbee. Compare the official specs on the Shelly 2PM Gen4 Knowledge Base and Shelly Plus 2PM Knowledge Base.
Wiring and Mounting
⚠️ Safety first! Always turn off the circuit breaker and verify there is no voltage before touching any wiring. Mains installation and motor wiring should be performed or reviewed by a qualified electrician in accordance with local electrical codes and your motor manufacturer’s manual.
Official AC Cover-Mode Wiring Diagram
The Shelly 2PM fits inside a standard wall box behind the shutter switch. Always follow the official AC cover mode wiring diagram from the Shelly 2PM Gen4 documentation:
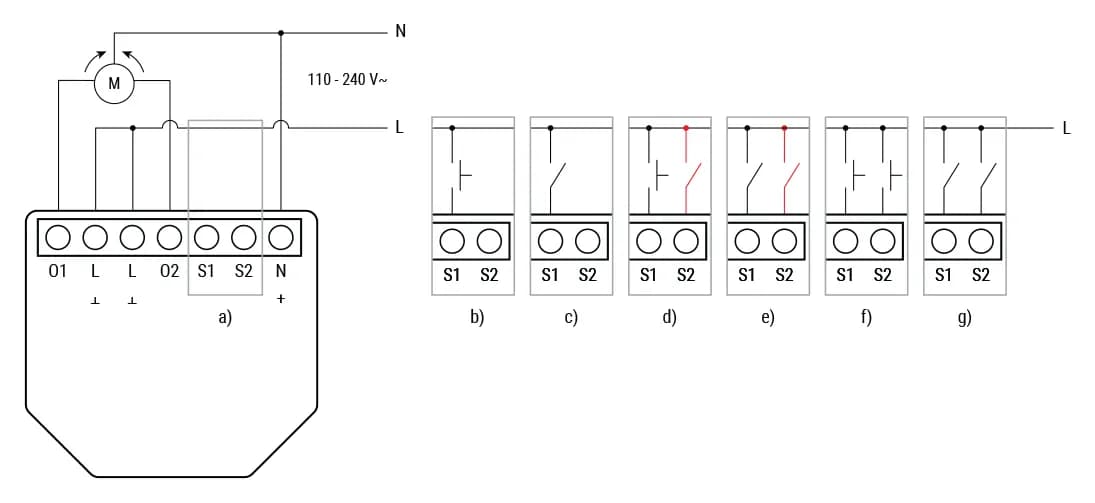
| Terminal | Connect to |
|---|---|
| L | Live (110–240 V~ phase) from the breaker |
| N | Neutral |
| O1 | Motor directional wire 1 (UP / OPEN) |
| O2 | Motor directional wire 2 (DOWN / CLOSE) |
| S1 | Wall switch input 1 (UP) |
| S2 | Wall switch input 2 (DOWN) |
As shown in Shelly’s official AC cover-mode schematic above:
- The motor’s common wire connects to Neutral (
N), shared with the Shelly’sNterminal. O1andO2are the switched Live outputs that energize the two motor windings (UP and DOWN directions).- Depending on your physical wall switch setup (diagrams a–g above: detached, single push-button/toggle, safety switch, or dual push-button/toggle), S1 and S2 switch Live (
L) into the Shelly inputs so physical buttons continue to work even if home automation connectivity is offline.
Mounting tips
- Use the included adhesive tape or cable ties to secure the Shelly inside the wall box.
- Keep the device away from direct contact with high-power cables to reduce heat build-up.
- Verify the motor doesn’t exceed the 10 A / channel limit of the Shelly 2PM.
Initial Configuration via the Shelly App
Before switching to Zigbee, we configure the device over Wi-Fi using the official Shelly Smart Control app.
1. Add the device
- Power on the Shelly 2PM Gen4 — it creates a Wi-Fi access point named
Shelly2PMG4-XXXXXXXXXXXX. - Open the Shelly app and tap Add Device.
- Connect to the Shelly’s AP and follow the wizard to join it to your home Wi-Fi network.
2. Set the device type to “Roller Shutter” (Cover)
- In the app, tap on the newly added Shelly 2PM.
- Go to Settings → Device Profile (or Device Type / Cover Mode).
- Select Cover / Roller Shutter (instead of the default 2-channel switch profile).
- The app will restart the device in cover mode, exposing a single cover entity with UP / DOWN / STOP controls.
3. Configure the inputs (wall switch)
- Go to Settings → Input/Output Settings.
- Set each input (
S1andS2) to Momentary Switch or Detached Switch, depending on the type of physical button you have:- Momentary (push-button): press once to start, press again to stop.
- Detached: the switch position has no link to the relay — control is entirely via the app or automations.
4. Calibrate the shutter (Wi-Fi)
- Go to Settings → Calibration.
- Tap Start Calibration.
- The shutter will move all the way up, then all the way down, measuring the travel time.
- Once finished, you’ll have accurate percentage-based positioning.
This calibration step is important even if you plan to switch to Zigbee later, because it confirms your wiring is correct and the motor works properly in both directions.
Switching to Zigbee Firmware
Once you’ve verified everything works over Wi-Fi, it’s time to switch the Shelly 2PM Gen4 (S4SW-002P16EU) to Zigbee mode for local-only, low-latency control through Home Assistant.
📌 Model compatibility note: Native Zigbee firmware switching requires the Shelly 2PM Gen4 (
S4SW-002P16EU), which features a multi-protocol wireless MCU supporting Wi-Fi, Bluetooth, and Zigbee (Shelly 2PM Gen4 KB). Do not attempt this procedure on a Shelly Plus 2PM (SNSW-002P16EU) — the Plus 2PM is a Gen 2 device that only supports Wi-Fi and Bluetooth (Shelly Plus 2PM KB).
Why Zigbee?
- No cloud dependency — everything stays local.
- Mesh network — Zigbee devices (especially mains-powered ones like the Shelly 2PM Gen4) act as routers, extending your mesh.
- Lower latency — commands are instant, no round trip to the internet.
How to switch firmware via the Shelly Web UI
- Open a browser and navigate to the Shelly’s IP address (e.g.
http://192.168.1.45). - Go to Settings → Firmware (or Zigbee settings on the Gen4 Web UI).
- Select the option to Switch to Zigbee firmware (supported on Shelly 2PM Gen4, model
S4SW-002P16EU). - Confirm the switch. The device will download/apply the Zigbee firmware and reboot.
- After the reboot, the device runs in Zigbee mode as a Zigbee router. Depending on your setup, Wi-Fi access may no longer be available.
⚠️ If Wi-Fi access is no longer available after the switch, use the Home Assistant/ZHA web panel for configuration and calibration. The write-attribute method below is a useful fallback when standard controls are not enough.
Integrating with Home Assistant via ZHA
Now that the Shelly 2PM speaks Zigbee, we need to pair it with Home Assistant using the ZHA (Zigbee Home Automation) integration.
Prerequisites
- Home Assistant with ZHA already configured and a Zigbee coordinator (e.g. ConBee II, SONOFF Zigbee 3.0 USB Dongle Plus, or SkyConnect).
- The Shelly 2PM powered on and in Zigbee pairing mode (it usually enters pairing mode automatically after the firmware switch).
Pairing steps
- In Home Assistant, go to Settings → Devices & Services → ZHA.
- Click Add Device (or the + button).
- Home Assistant will start scanning for new Zigbee devices.
- The Shelly 2PM should appear as a new device within 30–60 seconds. If it doesn’t, try power-cycling it (turn off and on the breaker) to re-enter pairing mode.
- Once paired, Home Assistant will create a Cover entity (e.g.
cover.shelly_2pm_xxxx) with open, close, stop, and position controls.
Configuration and Calibration after Zigbee Switch
After switching to Zigbee, complete the configuration and calibration directly from the Home Assistant web panel (ZHA device page). This is the standard workflow after the switch.
Normal workflow from the web panel
- In Home Assistant, go to Settings → Devices & Services → ZHA.
- Open the Shelly 2PM device page.
- Use the available controls/options in the device panel to complete cover setup and verify open/close direction and positioning.
- Run calibration from the device controls in the web panel when available.
Exceptional fallback: Write attribute from ZHA
If Wi-Fi access was disabled/lost and you need a direct low-level trigger, you can force calibration by writing an attribute in ZHA.
- In Home Assistant, go to Settings → Devices & Services → ZHA.
- Find the Shelly 2PM device and click on it.
- Click Manage Zigbee Device (at the bottom of the device page).
- In the Zigbee device management panel, locate the Window Covering cluster.
- Look for the attribute called Window Cover Mode (attribute ID
0x0017/ decimal 23) — or find the mode attribute associated with calibration. - Write the value
10to this attribute.- This triggers the calibration procedure: the shutter will move fully up, then fully down, measuring travel times.
- Wait for the shutter to complete both movements. Once done, the cover entity in Home Assistant will report accurate position percentages.
💡 Tip: If the “Manage Zigbee Device” panel doesn’t show the attribute, make sure you select the correct endpoint (usually endpoint 1 for the cover) and the correct cluster (
Window Covering— cluster ID0x0102).
Step-by-step in the ZHA UI
- Go to Manage Zigbee Device → Clusters tab.
- Select Endpoint 1 → Window Covering (0x0102).
- In the Attributes section, find window_covering_mode (attribute
0x0017). - Set the value to 10 and click Write Attribute.
- The Shelly will start the calibration cycle.
After calibration, you can verify it worked by sending the cover to 50 % — it should stop roughly halfway.
Summary
| Step | Tool |
|---|---|
| Wire the Shelly 2PM to motor and switch | Screwdriver 🔧 |
| Configure as Roller Shutter + Calibrate | Shelly App (Wi-Fi) |
| Switch to Zigbee firmware | Shelly Web UI |
| Pair with Home Assistant | ZHA integration |
| Configure/calibrate after Zigbee switch | Home Assistant web panel (ZHA device page) |
| Emergency calibration fallback | Manage Zigbee Device → Write attribute 10 on Window Cover Mode |
That’s it! You now have a fully local, Zigbee-controlled roller shutter integrated into Home Assistant — no cloud required.